*This is part of my mini-series of
Go! cutter reviews. So now, here is my review of "
Rob Peter to Pay Paul". I plan to review
the Strip cutter die, a
rag die, and hope to have the giveaway ready to begin on Saturday or Sunday! Please leave your questions in the comments, and I will answer all I can in the "Giveaway with a Q & A" post*

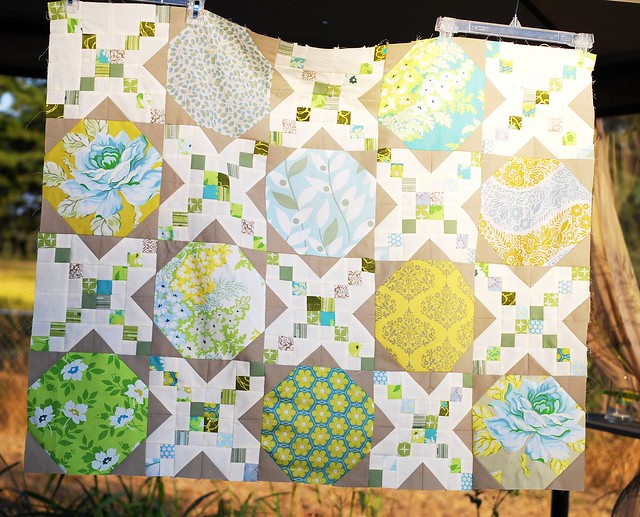
When I set about the task of picking out my three dies to go with the Go! cutter, I knew immediately I wanted this
one: the "Rob Peter to Pay Paul"
I love curves in quilts. I love petals. I love cathedrals. This design has all those elements in it.
_________________________________________________
I tried a couple different materials with this die set:
- Standard quilting cotton by Moda (Breakfast at Tiffany's with Bella Snow to be exact)
- Canvas weight Far Far Away 2 by Heather Ross
- Heavy linen from French General for Moda
The logistics:
For the regular quilting weight, I used a layer cake. This die is sized to work with the 10" x 10" mat, and in case you weren't aware, layer cakes are a 10" square.
The Go! can cut up to six layers of regular weight at a time, but I found I preferred to crank through four or five.
With a layer-cake square, you do end up with some waste for this die (P.S. If you want my "left-overs, leave a comment and I'll send them to someone").
But because of the shape of the curves, the waste is kind of necessary, and would be about the same if you were cutting them by hand. You can get away with an 81/2" to 9" square if you're not using a layer cake.
This die is actually a set of two: the center-pieces and the petals. The petals are split in half so that you do not have bias edges.
I used a 5" x 10" piece of fabric, and it worked beautifully. Getting six layers through with this die was not a problem at all.
As for sewing them together.
Cutting was easy; however, the directions that come with the die say to pin.

I don't pin unless it's an intersection.
I made about 2 blocks with the pinning method. AND. I. HATED. IT.
I was heartbroken thinking I might not like or use my beautiful die.
Then I decided to try
this method which I have used before for curves. And it worked! And suddenly, I loved them again. The die is set up so there's a scant 1/4" off-set, so I did start it with the pointy part of the petal up almost 1/4". The little notches lined up almost every time.
_____________________________________________________
What I like about this die:
- the shape is wonderful
- easy construction (if you don't use pins)
- easy to cut
- beautiful design (I think I already said that)
- Works well straight or on-point
- Had no problems whatsoever cutting through the heavy linen (I had it 4 deep)
What I don't like about this die:
- Working with all those bias edges can get a bit stretchy (I recommend starching your pieces first)
- The intersections when joining rows are really bulky (I didn't lose any needles, but my machine kept wanting to eat the under-sides, and I sometimes had to lift the presser foot to get it to move through)
- Sort of a plus and a minus -- the split on the petal, while making things easier, means it is more difficult to use a reverse of the design and put the print on the petals.
- It was hard on my cutting mat -- and nearly split it in one spot (which I shall ask accuquilt, but I don't think that's supposed to happen)
- the cost is prohibitive for some of us
But I think I'll be making a lot more quilts with this die. I really do like it.
Oh, PS -- For the Breakfast at Tiffany's quilt, I can't decide whether I should do a chenille border (like with
this quilt) or go with some of this print.

Don't forget to leave your Questions!
And if you're looking for what I did with the round flower appliqué die, then you can see it
here. :)