


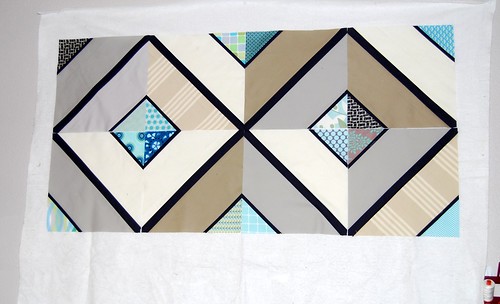
I've got 32 of the required 48 blocks done (for the size I'm doing... twenty-eight of them are pictured above.)
This is my version of Cara at Me? A Mom?'s Urban Lattice Quilt Along.

You can find a list of all Cara's directions here.
Materials needed: a 12 1/2" ruler (I got mine here when it was on sale last year some time)
Cutting:
I used Cara's specifications, with a couple changes...
For the main body pieces: I didn't use a trapezoid template, but just cut mine at 5 1/2" x half the WOF (don't worry about trimming selvages)
I added a small inner strip of the contrast lattice that I cut at 7/8" x ~11" (I cut the WOF in to fourths)
________________________________________
*Note: All seam allowances are 1/4" and I pressed all seams open for this block
- Sew a body piece to each side of your main 1 1/2" x half the WOF center lattice strip. The lattice strip will finish at 1".
- Shown in the picture below is a completed body section.
- Mark at about 10 1/2" from the top. There are tiny white marks on the lattice strip. These mark the approximate center of my piece. I used the lines on my cutting mat to help me keep everything straight, then laid the quilting ruler across a line to mark the outside edge of the center.

- If you want to add an inner contrast strip to your triangles, cut 7/8" x WOF strips and cut those in to fourths. Take your 5 3/4" squares, cut them in half on the diagonal, and sew the contrast strip to the hypotenuse (bias edge) of the triangle. Press.

- Line up the flag section (that's what I called it) so that the raw edges are lined up RST, and the point of the triangle (at the right angle) is pointing at the center mark. (You can see the little white marks better in this picture). Sew down and press.

Now is time to trim everything up!
Originally, I had taped my ruler to see where the edges lined up on my 12 1/2" ruler.


As you can see, that didn't work out very well, and wasn't actually necessary.
- The diagonal center of the ruler is marked in one direction (It's hard to see in my picture -- click here to see what I'm talking about). I lined that up in the center of my lattice strip (I drew tiny dots equidistant away from the corner of the ruler to mark where the edge of the lattice should line up with the edge of the ruler.
- Center the ruler(ish) and trim on all sides.

- A completed Urban Lattice block (sans paper piecing)!

Making your blocks this way does require a consistent seam allowance and accurate cutting, so I wouldn't necessarily recommend it for an early beginner, but the blocks do line up so nicely. I am confident my lines will look great when I sew them together.
P.S. Quilt Hope In is accepting donations for a "soft" opening! (We're trying to get all the kinks worked out with funding,etc.)
8 comments:
I love that quilt! It looks amazing! Your color choices are superb!
cool!
That quilt looks great!!
I love it! I'm so glad I found the link for Quilt Hope In! What a wonderful idea! I'll have to contribute something! :)
I love your fabric choices and layout, it's gorgeous!!!!!
What an amazing job you've done! It is so architectural! Very cool and clean lines. I love it.
What a wonderful idea, thanks for the tutorial, now I want to start to make this quilt. Yours looks amazing.
This quilt is really awesome, as is your method! And I think the inner lattice on the squares takes it to another level - well done! I'm completely inspired!
Post a Comment